2. Modeling A#
2.1. Characteristics of modeling A#
The modeling is 3D and uses law ENDO_ORTH_BETON.
2.2. Characteristics of the mesh#
Number of knots: 8
Number of meshes and type: 1 HEXA8
2.3. Loading description#
2.3.1. First step: traction along the X axis#
side \(\mathrm{ADHE}\): \(\mathrm{DX}=0\)
side \(\mathrm{ABFE}\): \(\mathrm{DY}=0\)
side \(\mathrm{ABCD}\): \(\mathrm{DZ}=0\)
side \(\mathrm{DCGH}\): \(\mathrm{DY}=0\)
side \(\mathrm{EFGH}\): \(\mathrm{DZ}=0\)
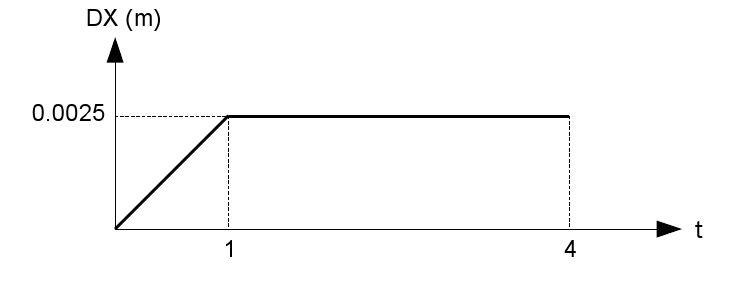
side \(\mathrm{BCGF}\): \(\mathrm{DX}=\mathrm{2,5}\times {10}^{-3}\)
The displacement \(\mathrm{DX}\) imposed on face \(\mathrm{BCGF}\) varies progressively according to the function shown in the figure below. Once the maximum is reached at \(t=\mathrm{1s}\), the \(\mathrm{DX}\) movement of the face \(\mathrm{BCGF}\) is then blocked for the next steps.
2.3.2. Second step: traction along the Y axis#
side \(\mathrm{ADHE}\): \(\mathrm{DX}=0\)
side \(\mathrm{ABFE}\): \(\mathrm{DY}=0\)
side \(\mathrm{ABCD}\): \(\mathrm{DZ}=0\)
side \(\mathrm{BCGF}\): \(\mathrm{DX}=0\)
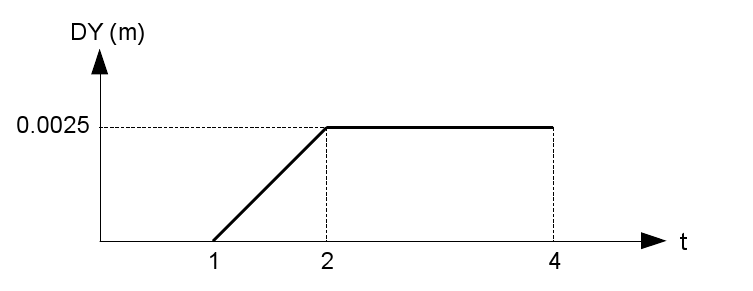
side \(\mathrm{DCGH}\): \(\mathrm{DY}=\mathrm{2,5}\times {10}^{-3}\)
The displacement \(\mathrm{DY}\) imposed on face \(\mathrm{DCGH}\) varies progressively according to the function shown in the figure below. Once the maximum is reached at \(t=\mathrm{2s}\), the \(\mathrm{DY}\) movement of the face \(\mathrm{DCGH}\) is then blocked for the next steps.
2.3.3. Third and fourth steps: charging, discharging, and compressing along the Z axis#
side \(\mathrm{ADHE}\): \(\mathrm{DX}=0\)
side \(\mathrm{ABFE}\): \(\mathrm{DY}=0\)
side \(\mathrm{ABCD}\): \(\mathrm{DZ}=0\)
side \(\mathrm{BCGF}\): \(\mathrm{DX}=0\)
side \(\mathrm{DCGH}\): \(\mathrm{DY}=0\)
side \(\mathrm{EFGH}\): \(\mathrm{DZ}\ne 0\)
The displacement \(\mathrm{DZ}\) imposed on face \(\mathrm{EFGH}\) varies progressively according to the function shown in the figure below:

2.4. Tested sizes and results#
The results are read at Gauss point 1.
Size |
Order Number |
Reference Type |
Reference |
Tolerance (%) |
\(\mathrm{V1}\) |
|
Non-regression |
||
\(\mathrm{SIXX}(\mathrm{Pa})\) |
|
Non-regression |
||
\(\mathrm{V2}\) |
|
Non-regression |
||
\(\mathrm{SIYY}(\mathrm{Pa})\) |
|
Non-regression |
||
\(\mathrm{V3}\) |
|
Non-regression |
||
\(\mathrm{SIZZ}(\mathrm{Pa})\) |
|
Non-regression |
||
\(\mathrm{V3}\) |
|
Non-regression |
||
\(\mathrm{SIZZ}(\mathrm{Pa})\) |
|
Non-regression |
Table 2.4-1