1. Aster2 conversion test case EPX#
The validation test is based on the conversion of a code_aster plexu03a test that is provided in the test directory in module EUROPLEXUS: resources/examples/code-aster-plexu.
Three files are used for this validation test:
plexu03a.com
plexu03a.mail
plexus03a.export
1.1. Loading the study into module EUROPLEXUS#
Several possibilities are available for loading a study from module EUROPLEXUS available in IHM salome_meca via « Commands file ».

Figure 1.1-1: Module EUROPLEXUS, Input Files tab
If the user has a export file including the names of the code_aster command files as well as the mesh, simply load it into « Commands file », these are automatically returned to « Commands file » and « Mesh file ».
The user can directly enter a code_aster command file in « Commands file » as well as a mesh in « Mesh file »
If the command file for study EUROPLEXUS was generated beforehand, it can be directly entered in « Commands file » and the associated mesh in « Mesh file ».
In the first two cases, the transformations necessary to launch a EUROPLEXUS calculation will be performed, for this purpose a command file EUROPLEXUS (.epx) as well as a mesh file (.msh) will be generated from the data provided, in the same directory as these.
When loading a study, if the keyword ETAT - INIT is present, EUROPLEXUS will start the calculation from an initial state resulting from a concept resulting from Code_Aster. The fields provided to Europlexus are those corresponding to the last moment of calculation of the given result concept. The fields are added to the « .msh » mesh file for EUROPLEXUS.
Important
Copy the plexu03a test files (see § 1) from the folder
/opt/salome_meca/ <VERSION> /modules/ EUROPLEXUS_ <TAG> /share/salome/resources/europlexus/examples/code-aster-plexu/plexu03a. * to a local directory LOCAL_DIRoù you have write rights.
Using the « Browse » icon in the « Commands file » bar, search for « plexu03a.export » in the LOCAL_DIR folder. The « plexu03a.comm » and « plexu03a.mail » files are then loaded. A click on « CONTINUE » allows the EUROPLEXUS command file to be generated.
1.2. Viewing the command file EUROPLEXUS#
In the « Study Review » tab, the « Commands file editor » section displays the content of the command file EUROPLEXUS generated from the code_aster command file and the mesh provided.
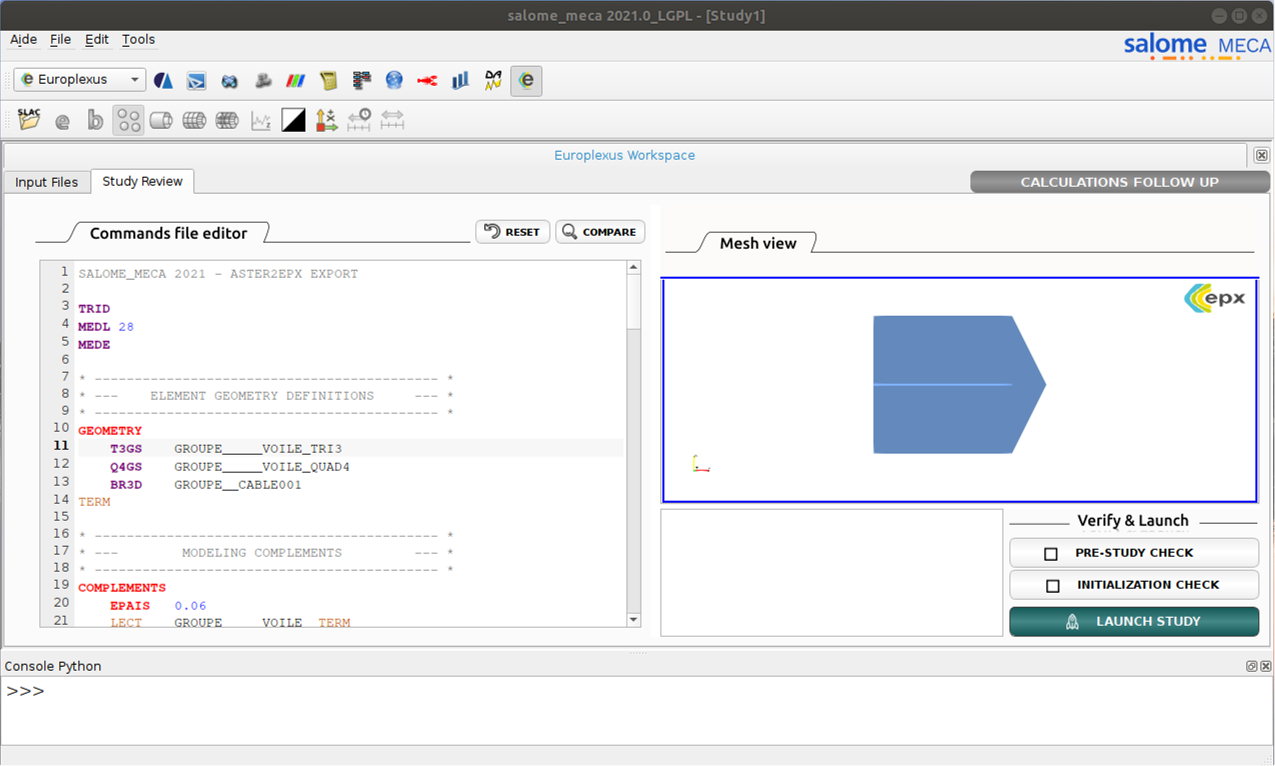
Figure 1.2-1: Module EUROPLEXUS: Study Review tab
For a complete modeling, the following keywords are required:
GEOMETRY,
MATERIALS,
CHARGE,
ECRITURE,
OPTIONS,
CALCULATION.
The optional keywords that depend on the case and the user are:
COMPLEMENTS,
LINK,
INIT MEDL,
INTERFACE,
STRUCTURE,
RESULTAT,
SORTIE.
In the « Mesh view » tab, the mesh is represented.
When selecting the elements in the command file, the characteristics of a mesh group in the « Mesh view » tab.

Figure 1.2-2: Module EUROPLEXUS: Deleting groups of elements
When keywords specific to Europlexus are selected in the order file, a browser automatically opens the documentation relating to the selected keyword.

Figure 1.2-3: Module EUROPLEXUS: documentation of keywords
Three actions are then possible:
PRE - STUDY - CHECK checks the overall structure of the generated command file and the syntax. A window opens and traces all the checks made (see Figure)
Figure 1.2-4: Module EUROPLEXUS: Pre-study check
INITIALIZATION CHECK tests each command and its arguments, starting a EUROPLEXUS calculation and stopping it before the integration loop.
Important: This feature requires access to a local EUROPLEXUS installation.

Figure 1.2-5: Module EUROPLEXUS: Initial State Check
LAUNCH STUDY allows you to launch the EUROPLEXUS study. When « LAUNCH STUDY » is executed, it is possible to define the name of the study, choose the server, the version of EUROPLEXUS and the type of execution (sequential or parallel). When you press « SUBMIT », the EUROPLEXUS study is launched.

Figure 1.2-6: Module EUROPLEXUS: launch calculation parameters
Executing Europlexus (Starting calculation)
After starting the calculation, the module goes to the working mode called « Calculations follow-up ». In this mode, the « Calculations follow-up-table » area allows you to find the name of the study, its identifier, the server, the version of EUROPLEXUS, as well as the progress. When the study is complete, « Successful » appears in « Progress » or « Failed » in case of error.

Figure 1.3-1: Module EUROPLEXUS: tracking calculations in « Calculations Followup »
1.3. Study data#
On the calculation tab, the study data (local directory) is displayed in the « Local calculation directory » area. This directory is created after the calculation is started in the epx-studies folder in the user’s home directory (/home/<username>). This tab can contain multiple studies.
Will be present in this folder:
command file EUROPLEXUS « case.epx »
information on the execution of the « case.listing » calculation
the file including the mesh and the results of study EUROPLEXUS « case.med »
The mesh file from code_aster interpreted « case.msh »
The time steps at which the calculation was run « case.output »
Optionally:
The curve.pun file if the « COURBE » output was requested.
When you press the « Refresh » button the « Local calculation directory » tab contains more items:
.vtu file
*.pvd file
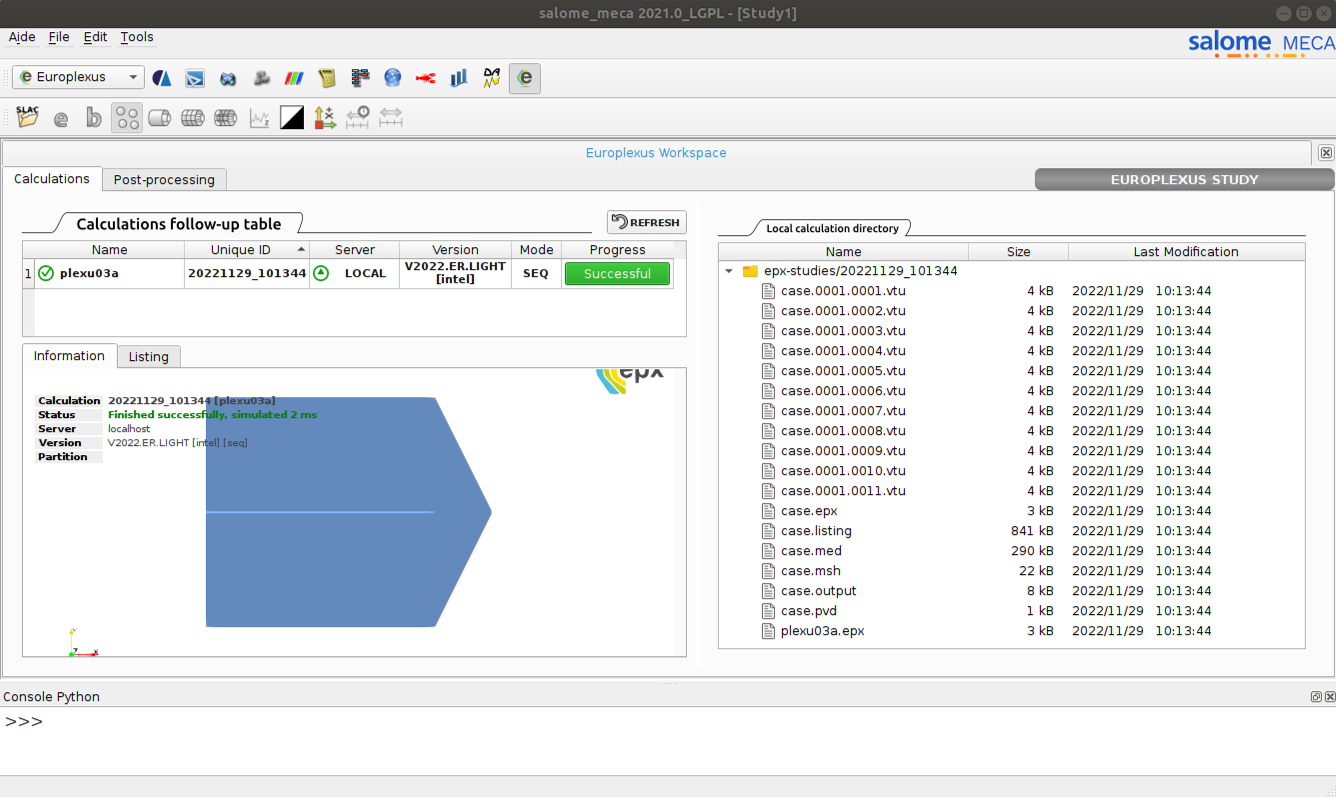
Figure 1.4-1: Module EUROPLEXUS: refreshing the state of the calculations
A code_aster command file allowing the rereading of the .med file containing the results of study EUROPLEXUS is generated, it is « Commandes_reprise.comm ». This file allows you to reread the fields from the study, to retrieve information concerning the mesh, model, CARA_ELEM panes. This file is located where salome_meca was started.
For the test case in question, plexu03a, we find the files « case.epx », « case.listing », « case.med », « case.msh », « case.output », « plexu03.epx »,… in the « epx-studies/date_time » folder.
Right-clicking on a calculation case offers several functionalities:
Go to the calculation directory
Trace memory usage
Review the study (reload in the Europlexus module)
Delete (interrupt and clean up)
Restart the calculation
Duplicate the calculation and launch it

Figure 1.4-2: Module EUROPLEXUS: menu linked to the calculation case
1.4. Return to Asterstudy#
The command file « Commandes_reprise.comm » can be loaded by « Add Stage from File ». You must then enter the location of the result mesh file « case.med » as the source file for all fields except the mesh where the initial mesh « plexu03a.mail » will be entered.
The post-treatments can then be executed following the re-reading of the fields, all of which are saved in the « resu » table.