3. Using code_aster on Cronos#
As of salome_meca 2021, the server should already be set up. In previous versions, it is necessary to follow the steps below.
3.1. Addition of the Cronos server in SALOME /AsterStudy#
After making sure that you can connect from your local computer to Cronos without a password (using a SSH key), you can configure the new server in salome_meca.
In salome_meca 2020, you should not use the full name cronos.hpc.edf.fr since there was an automatic configuration in AsterStudy to set up the working directory for Eole and Gaia.
Operating procedure:
Start salome_meca and open the JobManager module;
In the « Resource Catalog » section at the bottom right, add a server by entering the following values:
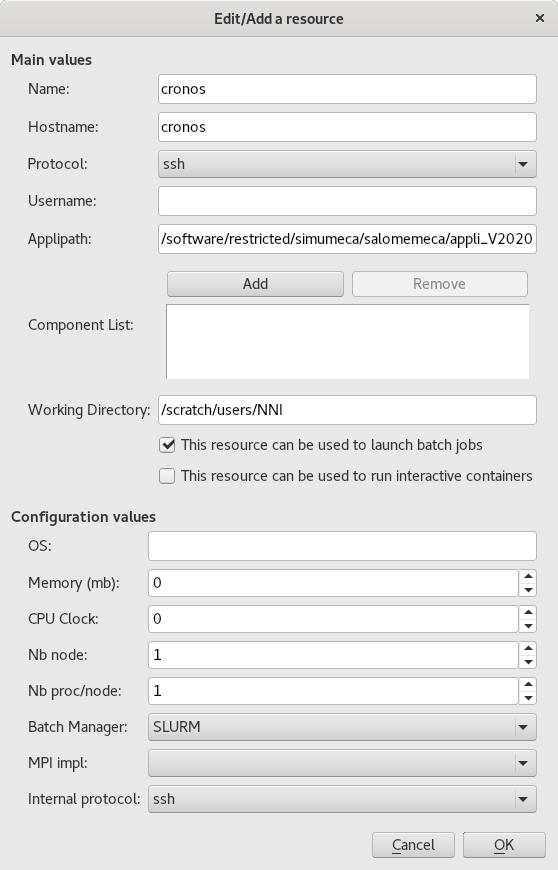
In « Hostname », do not enter the name with the domain name hpc.edf.fr (see below);
In « Working Directory », fill in your own NNI;
By entering « cronos » in « hpc.edf.fr », you must make sure that you can access it. Do « ssh cronos » to check it. If this is not the case, you must edit (add if necessary) the $ HOME /.ssh/config file and insert:
Host Cronos
Hostname cronos.hpc.edf.fr
After that, « ssh cronos » should work and be equivalent to « ssh cronos.hpc.edf.fr ».
3.2. Adding the Cronos server in astk#
After making sure that you can connect from your local computer to Cronos without a password (using a SSH key), you can configure the new server in the ASTK interface.
Operating procedure:
Go to ASTK/Setup/Servers;
On the choice list at the top of the window, select the last choice « New Server »;
Enter a name, for example « cronos »;
For the other fields, refer to the following screenshot and don’t forget to replace NNI with your own NNI:
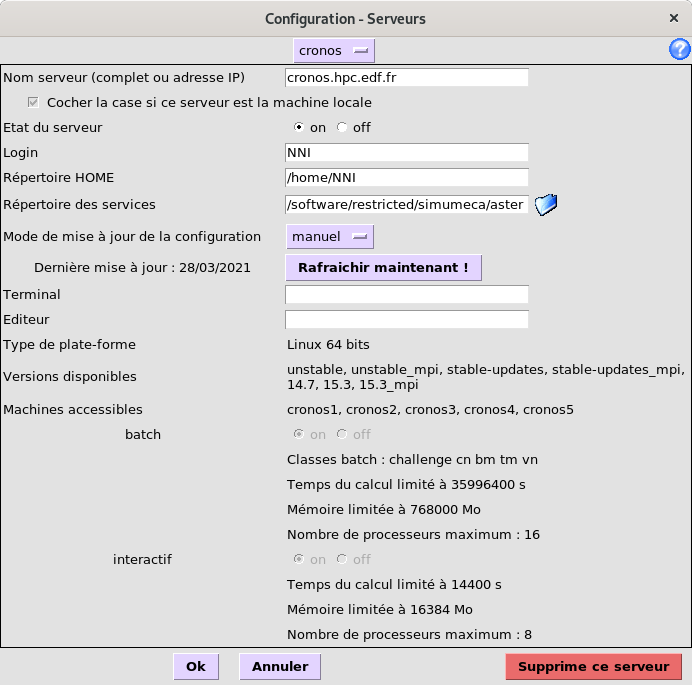
Click on the « Refresh Now! » button
3.3. Locating the tools#
On Cronos, the current commands to launch astk, as_run, or salome are available in /software/restricted/simumeca/aster/bin.
nni @crfront1: ~$ls /software/restricted/simumeca/aster/bin
As_Run Astk Salome
It is best to use these links that point to the actual installation paths to access the latest product updates.
3.4. Starting batch calculations#
Since access to calculation nodes to launch interactive processes is not authorized, the only way to launch calculations is through the batch manager. The batch manager used is Slurm. Reference may be made to the following document:
< https://si-scientifique.edf.fr/index.php/SLURM_CRONOS_Clusters_EN >` https://si-scientifique.edf.fr/index.php/SLURM_CRONOS_Clusters_EN`_
In particular, we will find out how to execute commands interactively on calculation nodes. The principle is to reserve resources with salloc, then to connect interactively to the allocated computing node.
See also the useful commands:
cce_mqinfo: gives details on the available files
cce_mpinfo: gives information on the availability of calculation nodes
cee_mpp: list the user’s jobs (equivalent to squeue)
3.5. Choice of batch classes according to memory#
There are three main partitions for starting computation: cn, mb, and tm.
It is necessary to choose the right partition according to the calculation to be performed.
With AsterStudy, all you have to do is give the name of the partition to use in the launch parameters (« Advanced/Server partition » tab).
With astk, you can also enter the name of the partition in the « Options/Class » menu.
In addition, when the launch is managed by astk, if the partition has not been given by the user, it is chosen automatically (according to frequent cases).
The memory available per node is:
192 or 384 GB for cn (5 times more nodes than BM)
384 or 768 GB for BM
6 TB for tm
The criterion considers the memory requested per node. If 8 GB is requested for a sequential calculation, the memory required per node is 8 GB. If it is a parallel calculation with 6 processes per node, the memory requested per node is 24 GB.
In all cases, the memory reserved for code_aster is not changed. We only change the maximum memory for the job.
The automatic choice is as follows:
If the memory per node is less than 64 GB, we choose the cn partition and we ask for 96 GB more for the job (for example 24 + 96 in the previous example) which can be used as a « disk ».
If the memory per node is greater than 300 GB, we choose the BM partition.
If the memory per node is greater than 700 GB, the tm partition is chosen.
The objective is to use cn nodes when possible since there are much more of them.